Showing posts with label Geo Replication. Show all posts

Friday, October 27, 2017

SQL Azure Databases - Active Secondary - Failover Groups - Part 4

150th Blog Post . So, the post involves video demo :)

Previous posts on this series was about using "Geo Replication" to configure active secondary. However, it comes with few limitations like

* No transparent failover capabilities like Always on Listener

* No availability groups and group failover possible

So, Azure Failover Groups provides "Read Only" / "Read Write" connection URLs which allows applications transparent failovers. Read only and Read write workloads get different connection strings and upon failover, applications connect to the appropriate node automatically

Also, one can combine group of databases as a unit of failover and make them failover together as well, as done in Always on availability groups. 

Step by step instructions on configuring availability groups provided below

* Configure Primary Server, Secondary Server and Geo Replication as explained in http://strictlysql.blogspot.sg/2017/05/sql-azure-databases-active-secondary.html

* Click on the primary server ( not database ) and select failover groups


* Click on the add group and

          * Provide the failover group a name
          * Pick the existing database "db1" to be added to the failover group
          * Pick the existing secondary server
          * Click on create


* Once done, failover group is listed as shown below


* Click on the failover group, Read only and Read Write URLs can be seen as shown below


* To perform failover click on the failover icon. Post failover, failover group looks like the picture below


To make the understanding easier, I have recorded the video of the demo. Please take a look. Happy learning


Friday, June 9, 2017

SQL Azure Databases - Active Secondary - Failover - Part 3

Continuing on the series on SQL Azure Databases - Active Secondary, this post will explore the task of failing over to secondary.

Fairly straightforward task, just one needs to take care of few items.

Step 1: Login into portal.azure.com and click on Databases. The primary and secondary databases are listed


Step 2: Click on the primary and then click on "Geo Replication"


Step 3: Scroll down and click on the secondary as shown below


Step 4: Click on Failover as shown below


Step 5: Click "Ok" to confirm Failover


Step 6: The dotted lines between primary and secondary, showing the failover progress, turn to solid line upon completion of failover


Step 7: After failover, the replication role changes confirming the successful failover as shown below


Step 8: Secondary server accepts write operations as shown below


Few important things to know

This failover is like a DB Mirroring failover. This means application will need to change their connection strings to secondary server upon failover. Unlike, Always on Availability groups, azure geo replication explained above, doesn't support transparent application failover.

However, Azure Failover Groups (right now in preview) allows transparent failover for applications. More about that on next post :)

Saturday, May 27, 2017

SQL Azure Databases - Active Secondary - How to connect? - Part 2

As a continuation of "SQL Azure Databases - Active Secondary" series started earlier, this post will cover how to connect to a azure SQL Database primary and secondary after configuring "Geo Replication".

To some, it may sound like "what is the big deal in connecting to, after configuring it". If you are new to azure, it can take a while for you figure out how to connect and at sometimes it can turn out to be one of those annoying simple things, which refuse come off in easily :)

As described in the earlier post, we have configured the following

* Database called "rajprimary" on "rajprimarysvr" server
* Geo replicated database copy of "rajprimary" on "rajsecondary" server  


To connect to the primary or the secondary server, follow the steps provided below

Configure the firewall:


* Login to your portal.azure.com

* Click on SQL Databases on the left 


* Click on the primary / secondary databases ( as shown under replication role), depending upon the one you would like to connect to


* Click on set firewall as shown below


* Firewall settings are turned on and IP Addresses that are listed alone are allowed to access. Click on "add client IP" for allowing the machine that you are using, to connect to the azure database. 


* You may add other client IP Addresses to, if they are to connect to the database. Click on save after adding.


Connect to the database

* Start sql server management studio on the machine you are logged on, and connect to ".database.windows.net". In this case it would be rajprimarysvr.database.windows.net

 if you are not sure of your database servername, you may look at by clicking on "sql databases" -> "databasename" -> "Properties"

 * Provide the user account and password used while setting up the server

Upon connecting, one would notice that only database related components are visible. Server related components like SqlAgent, Server Error logs are not seen as we are using "Sql database" service on azure.


Same steps can be repeated for secondary server too. More on Azure - Geo replication in upcoming posts. 

Sunday, May 7, 2017

SQL Azure Databases - Active Secondary - How to configure? - Part 1

Dear all,

I have taken the azure dive at last :)
In case if you are new to azure, azure is the Microsoft cloud platform service, offering lots of services for handling data platform tasks. There are tons and tons of material on it and perhaps you can get a good introduction on the following links - here and here

This post is about SQL Azure Database - a service (a PAAS service ) which allows one to host just a database in cloud and a feature of it called "active secondary". "Geo Replication" - Active Secondary is a feature in SQL Azure in premium service tier ( similar to our enterprise edition but certainly not as costly :) ), which synchronizes data asynchronously to another server (either in the same geographical location or different ) and allows one to run read only queries to it.

In my opinion, the below specifications are perhaps the most common requirement of most modern day mid size applications.

  •  A database with good performance to store and retrieve data
  • A simple disaster recovery / high availability solution
  • Readable secondary if possible

All these with a really affordable cost ( will discuss that part soon ) , just in few clicks is what makes SQL Azure tick. This post will run thro the details on how to configure it.

Pre requisite:

1) Grab a Microsoft Azure subscription :)

 Demo :

Now for the step by step  "how to do" screenshots :)

1) Login to portal.azure.com and Click on SQL Databases -> Click on Create SQL Database


2) Provide the server name. Though one pays only for the database, one just needs to create a server to host the database. Server will be maintained by azure and no charges are applicable for the server while using  “sql azure database” service.


Provide unique names for
·         Database name
·         Resource group ( more about it later )
·         Server name

 3) Click on "Configure required settings" and provide Server Details to be provided as shown below
4) Set the service level to "Premium"
One needs to pick Premium to have readable secondary
5) Click on the create database to complete primary setup. Creation takes few minutes


6) Configure GEO replication - secondary

Once the notification bar indicates that the primary has been created, click on sql databases to find the primary database created.
Pick “Geo Replication” as shown below


7) Configure GEO Replication

The screen below allows one to pick the geographical location of the secondary server. If one needs lesser latencies, closer locations to primary are preferred


8) Once location is picked, one is prompted to fill in the rest of the details of secondary server
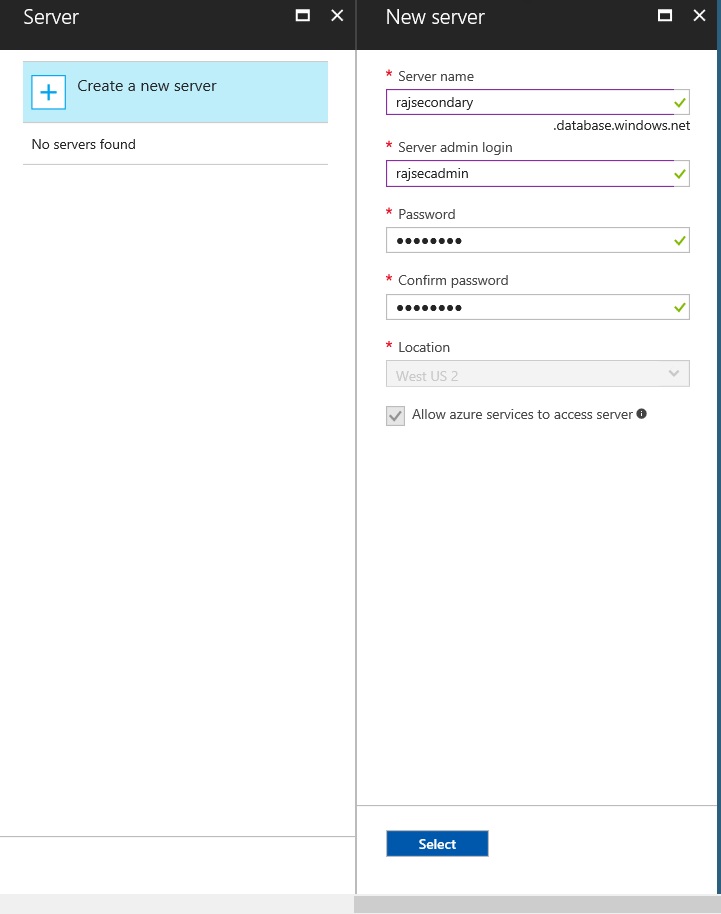
 9) Create a secondary server similar to primary, by providing details like servername and admin login name
10) Create the secondary server


Upon clicking ok, Primary and secondary starts to synchronize as shown below

11) Synchronization completion
The completed tick marks will indicate synchronization completion as shown below
Synchronization can take few minutes or longer depending upon data size. Once complete, click on SQL Databases on Azure Portal to verify as shown below
With that the setup of active secondary on sql azure database is complete. Pretty simple as it takes a few clicks and needs almost zero pre requisites. A similar setup on "on Premises" would take days to months in most places.
 That's a lengthy first post on SQL Azure - Active Secondary.  On subsequent posts, I will cover how to connect to primary and secondary, failover , monitoring and how applications can benefit via readable secondary and of course the cost involved as well.