Consider the situation where one needs to store multilingual data / Special characters into a table. For example Chinese characters or Tamil characters. Most of the folks would be aware that one should use NVarchar column instead of Varchar column as Nvarchar column can store unicode characters. This post explains the problem one faces while inserting special characters from a query. Consider the following script to insert some special character data into database
CREATE TABLE #sample
(
id INT,
spl_char NVARCHAR(500)
)
GO
INSERT INTO #sample
SELECT 1,
'我的妻子塞尔伽'
GO
INSERT INTO #sample
SELECT 2,
'மறத்தமிழன் '
The script executes successfully.Let us see the results. Refer to picture below.
We are surprised to see that the special characters are not inserted correctly. We have set the column as Nvarchar but still the special characters appear corrupted. Why?
The reason is when one is expilictly specifying the special character within quotation, one needs to prefix it with the letter N. For ex, while specifying 'மறத்தமிழன்', one needs to specify it as N'மறத்தமிழன்'. The reason is when a string is enclosed with single quotes, its automatically converted to Non Unicode data type or Varchar/char data type. Specifying the letter N before the quotes informs SQL Server that the next string contains unique code character and should be treated as Nvarchar.
Let us modify the script and try using inserting special / Unicode characters.
CREATE TABLE #sample
(
id INT,
spl_char NVARCHAR(500)
)
GO
INSERT INTO #sample
SELECT 1,
N'我的妻子塞尔伽'
GO
INSERT INTO #sample
SELECT 2,
N'மறத்தமிழன் '
GO
SELECT *
FROM #sample;
The result shows that the multilingual characters are now correctly displayed.
So one shouldn't forget to include the letter N while specifying NVarchar or special characters explicitly.
Tuesday, March 27, 2012
Inserting UniCode / Special characters in tables

Friday, January 13, 2012
File Group Backups - Intro
What is File Group backup?
Backing up a portion of a database, say a File Group is termed as Filegroup backup.
If you are wondering what are filegroups, then in short a Database's data files can be made of multiple files or groups of files. For more info on File Groups read here
When File Group backups are useful ?
Assume you have very large database with few hundred GBs or a few Terabytes. The database is divided into multiple filegroups, with recently loaded data in one file group and older data in other filegroups. For example, you have a database which maintains a shop's order/transaction details. Assume that the database is designed to have each year's transaction at one filegroup. Then, instead of backing up the entire database, it would save lot of disk space, if one backup's up the current year's file group alone.
How to take file group backups ?
The Screenshot shows how to take file group backup. Fairly straight forward.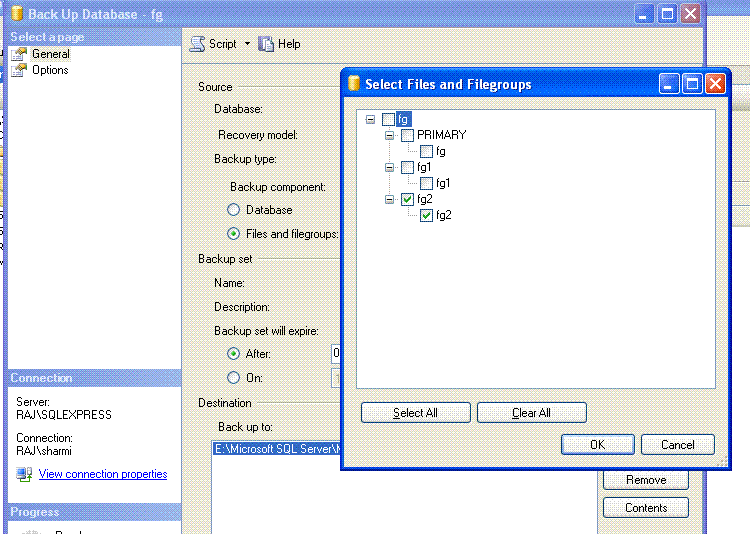
What are the advantages of file group backups ?
1) Saves lot of space as you backup only a portion of the backup.
2) Can bring the database online partially and at a faster pace. You can restore only your highest priority filegroup first, bring it online while filegroups havent been restored.
3) If a table or particular filegroup is corrupted then One can restore the filegroup seperately.
Requirements
Any backup strategy is said to work only when one can successfully recover the database. With filegroup backups, there is one basic principle. Each filegroups that is online should be consistent with the rest of the filegroups in the database. Also, the primary filegroup should be restored first for the database to be partially online.
To explain bit more, assume you have a database 'DB' with filegroups FG1,FG2,FG3. All are read write file groups.FG1 is the primary file group.You can bring the database online partially with either of these
* File group backups of FG1 alone
* File group backups of FG1 + FG2
* File group backups of FG1 + FG3
* File group backup of FG1 + FG2 + FG3 ( this becomes completely online )
However one should note that FG2/FG3 backup set should have the same Restoration point as FG1. Restoration point is the time upto which backups where taken for a file/filegroup.
Assume one has taken full backup of a database at 1 PM and transaction log backups at 2PM and 3PM. After that there were no backups taken for the database. Then the restoration point is termed to be 3PM. In other words, the time upto which you are restoring a backup is termed as restoration point.
So in our case, one CANT bring the database partially ( excluding FG1 alone ) online with
* FG1 file group backup taken on 10th Jan 9 PM
* FG2 file group backup taken on 9th Jan 9 PM
* FG3 file group backup taken on 8th Jan 9 PM
Attempts to restore with these 3 backups alone will fail as FG3 contains transactions upto 8th Jan night, FG2 upto 9th night and FG1 upto 10th night.
What CAN work is
* FG1 file group backup taken on 10th Jan 9 PM
* FG2 file group backup taken on 9th Jan 9 PM
* FG3 file group backup taken on 8th Jan 9 PM
* Additional T-Log backups from 8th Jan 9 PM to 10th Jan 9 PM.
T-Log backups from 8th Jan 9 PM to 10th Jan 9 PM contain all the transactions till
10th Jan 9 PM and upon restoration we can bring FG1,FG2,FG3 to the same restoration point.
In short the two most important principles for filegroup backups are
1) Primary Filegroup should be restored first.
2) All the Filegroups should have the same restoration point.
The table below shows the recovery models and Modes at which filegroup backups are useful.
| Recover model | Read only | Strategy |
| Full | No | Full FG backups + Differential + T-log backups |
| Simple | No | Doesn't work |
| Full | Yes | Full FG backups for Read write + T-Log backups |
| Simple | Yes | Full FG backups |
On the upcoming posts, I will be explaining various backup strategies and restoration scenarios in detail.
Tuesday, November 1, 2011
Log file size after backup and restore
Quick summary of the post:
A restoration of a full database backup retains the log file size before restoration.
Now for the details :
Consider a large database that you want to move from one server to another. Assume that the log file of the source database is huge. For taking a backup, the size of the log file doesn't matter as a backup operation always backs up only the used pages of database.After restoration, the restored database's log file size is same as the original database, even though the backup file used for restoration
is much smaller. If one has a space constraint in the destination server, then its better to shrink the log before taking the backup of the original
database.
Let us take the sample database dbadb . The database size is 107 MB with data file size being 16 MB and log file size being 91 MB. A full backup file size is only 3.2 MB
Database size 
Full Backup size 
A restore of the backup will create a database again at the original size of 107 MB with data and log file sizes being 16 MB and 91 MB respectively.
Restore of Database 
Database size of restored database 
So, if your destination server doesn't have enough space, then ensure your log file size is small before taking the full backup.
Tuesday, October 4, 2011
Backup/Restore vs Detach & Attach
You want to move a database from one server to another. There are two options to do that.
1) Detach/Attach: To Detach the database from source server and copy the Data and log file ( MDF and LDF ) of the database and attach it in the destination server
2) Backup/Restore: Perform a SQL Backup of the database and move the
backup file to destination server and Restore the database in destination server.
A simple comparison of both the methods.
Detach/Attach | Backup and Restore |
Detach/Attach is a offline operation. Source database will be inactive when you perform detach and attach operation | Source database can be accessed as it is a online operation |
Detaching and Attaching the database happens instantly irrespective of the size of the database.Time taken in migrating the database is same as the time taken for copying the data and log files from one server to another | Backing up a database can take considerabale amount of time ranging from few minutes to many hours depending upon the database. Restore of a database on a average takes about 3 times of backup time. So, total time taken in migrating the database would be backup time + restore time + time taken to move the backup file from one server to another |
Sometimes, if the Log file size is huge then one needs to copy large amount of data over the network | Backup file contains only used data pages in data file and hence the size of the backup file would not include the size of data log file |
Sometimes, if the Log file size is huge then one needs to copy large amount of data over the network | Backup file contains only used data pages in data file and hence the size of the backup file would not include the size of data log file |
If the data file is fragmented/ If the Data file has lots of free space with in the file ( allocated but unused ), then copying the data file would mean carrying additional bytes of data though the they are unused. | Backup copies only used data pages of the data file. So, the size of the backup is always close to the size of the size used with in the data file. |
Detach / Attach is not recorded in any table in msdb database. so one has no record of who detached/atatched who or when was it done, what were the files detached, what size or where the files are stored etc. | Backup and restore operation details are always stored in msdb database tables with information like size,date,location,type of backup / restore. |
Advanced options like mirrored backup/ partial backup/ compressed backup/ backup to tape/ point in time recovery are not available | All advanced options are available |
Detach and attach method is useful when one wants move the database fast, without caring much about the availaiblity of source server.Backup and Restore is certainly a much graceful way to do the same.
Thursday, August 25, 2011
Reading SQL Error log
SQL Error log can be read from SQL Server's management studio. However, Management studio is too slow and definitely not the greatest way of taking a quick look at SQL Error log. Sp_readerrorlog is definitely a much better command which can help us read a error log must faster way. Also , the script below Dumps the read error log into a temporary table. Once dumped one can use different kinds of filters as per our needs.
The script below loads error log into a temporary table, filters for a particular date range, removes error log entries for backup, and searches only for genuine error on the error log.
CREATE TABLE #error_log_dt
(
logdate DATETIME,
processinfo VARCHAR(30),
text_data VARCHAR(MAX)
)
INSERT INTO #error_log_dt
EXEC Sp_readerrorlog
SELECT *
FROM #error_log_dt
WHERE logdate BETWEEN '20110815' AND '20110821'
AND processinfo != 'backup'
AND text_data LIKE '%error%'
DROP TABLE #error_log_dt
Saturday, June 25, 2011
ALTER TABLE - Adding Column - Column Order Impact
Most of us would have altered a table structre by adding a column to the table. When an ALTER table script is used to add the column to the table, the column is placed on the last of the table. For inserting a column, in the middle of the table one needs to use the SQL Server Management Studio ( SSMS ).ie., Right click on the table and pick design table and then proceed to add a column. This post will deal with the significance of column order while adding a column to the table.
Consider the table 'sample'. The table contains about 800 rows with a size of 6 MB. Relatively small by a normal database standards.
Let us add column in the middle using SSMS as shown below. Once we click on save button to save the column addition, the operation completes immediateley.
Let me add a few more rows into the table. Now the table contains over 200K rows and the size of the table is 1.6 GB.
Now let me add a column to the middle of the table using SSMS as done proviously. Now the operation takes much much longer. Just in case if you face timeout error refer here.
Now the operation takes few hours to complete and the new column will be inserted between two columns as shown below.
Let us add one more column at the last of the table ( not in between the columns as doen previously). Refer to picture below.
ALTER TABLE sample ADD col3_int CHAR(5) 
Now the operation takes in 0 seconds to complete. The points to note are provided below.
* When we add a column to the middle of the table using SSMS, when the number of rows are higher, it consumes a longer execution time and resource.
However, when the number of rows are lesser it doesnt consume much of time and CPU/IO resource. This aspect is to be handled carefully where a DBA can fall for the trap if overlooked.
Assume, DBA is planning to perform a small column addition on the production server. DBA has already tested in staging and it was over in few seconds. DBA assumes that the operation is going to take a few seconds in production and plans accordingly. If the number of rows are higher in production, the DBA can be taken for ride and it can be different ball game all together.
So lesson to be learnt is Dont underestimate any table modification prepations and make sure to check size/# of rows on production before deployment.
* When the column was added to the end of the table ( without caring about position of the column ) using T-SQL script ( ALTER TABLE coomand ),it completed immediately without consuming much of time and resource, though the number of rows were very high.
Lesson learnt is insertion of a column to the middle ( or rather between two other columns ) of the table should not be done, unless there is a strong reason to do so. If there is no strong reason, then always add the column to the end of the table using ALTER TABLE script as they take much much lesser time to execute.
* Use scripts instead of SSMS GUI especially while performing table strucutre modifications or DDL operations.
We will take a much closer look in the next post exploring why such a behavior is observed.
Friday, June 17, 2011
Altering Table structure - SSMS - Timeout Expired
Altering a table using SQL Server Management Studio ( SSMS ) can be done by right clicking on the table and by picking the design table as shown below.
While adding a column, especially for a huge table, then management studio prompts saying changing the data can consume lot of resources and time as shown below.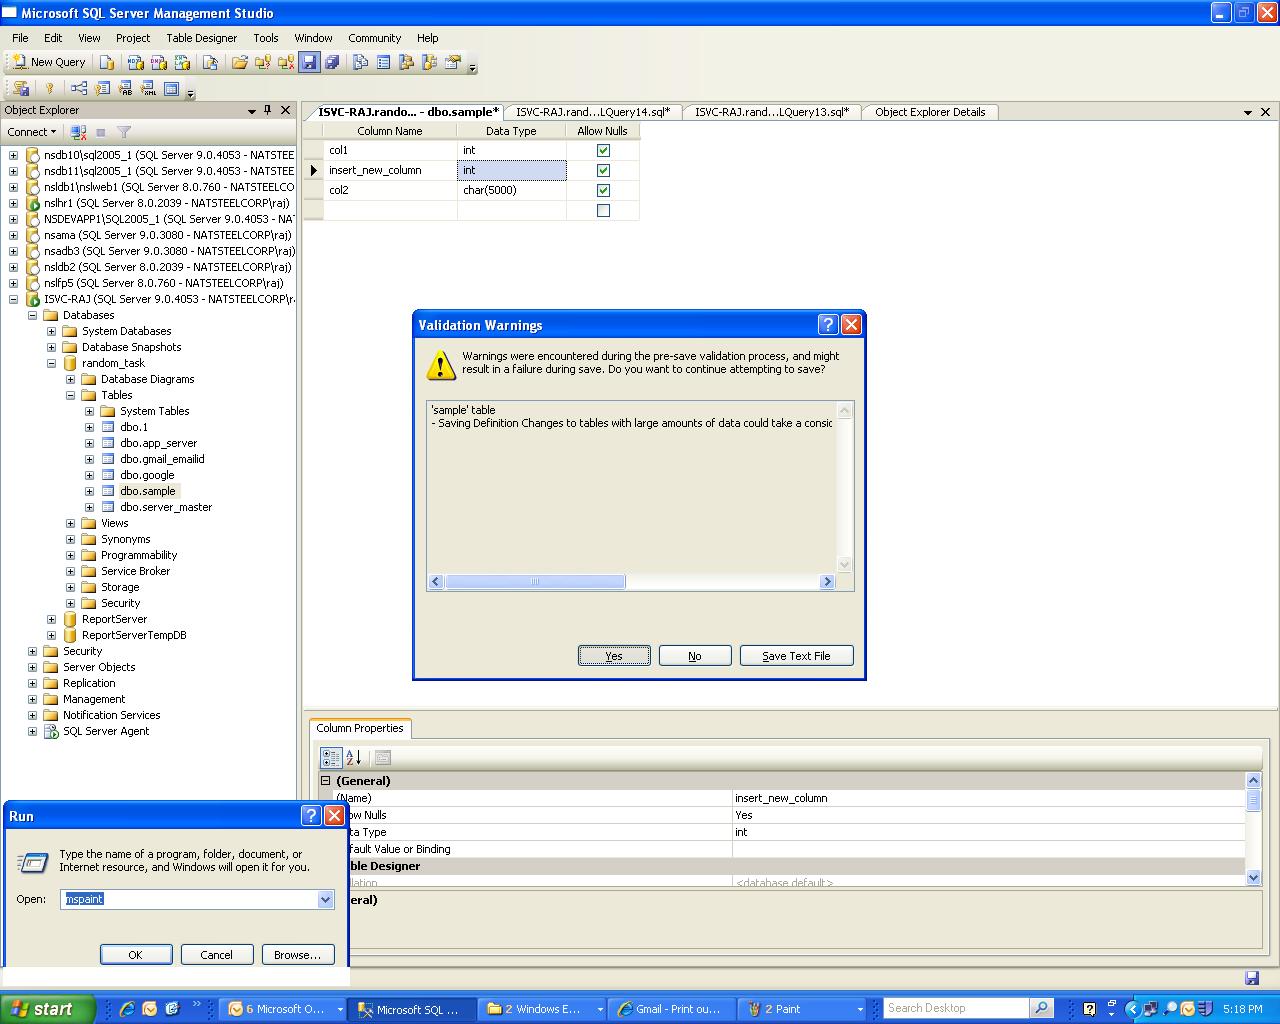
After clicking 'yes', if the alter table takes longer than 30 secs then the alter table fails with the error message 'Time out expired' as shown below.
The error can be avoided by changing the default setting in SSMS as shown below. Goto Tools->Options->Tables and Database Designer and set the option Transaction time out after to 1800 seconds from default 30 seconds . The default setting is shown below.