Continuing from the last post, let us analyze the structure of a non clustered index using DBCC IND/PAGE commands, when we have a clustered index on the table. To be specific, we will see the difference in structure of a Non Clustered index when we have unique clustered or non unique clustered index.
As already written earlier here, a Non clustered index will store clustered index key in its index.However, there is a small change in Non clustered index when the clustered index is defined as Non unique.When one searches using the Non clustered index , the clustered index key helps in reaching the actual row in the table. But, when the clustered index is not unique SQL Server adds a additional Unique identifier column along with the clustered index key on the non clustered index. We will see the same using DBCC IND and DBCC PAGE commands.
Table structure is provided below. Students table has 2 columns namely 'student_name','sid'.'sid' has a UNIQUE clustered index. student_name has a non clustered index.
CREATE TABLE [dbo].[students]
(
[student_name] [VARCHAR](50) NULL,
[sid] [INT] NULL
)
ON [PRIMARY]
CREATE UNIQUE CLUSTERED INDEX [CIX_students_id]
ON [dbo].[Students] ( [sid] ASC )
CREATE NONCLUSTERED INDEX [IX_students_name]
ON [dbo].[Students] ( [student_name] ASC )
I have loaded about 100,001 rows on the table. Let us see the structure on Non clustered index [IX_students_name] using DBCC IND/PAGE command.
Following steps are involved in reading the structure of the index.
1) Finding the root page of the index.
Execute the following command.
DBCC ind ( dbadb, students, 2)
GO
The third parameter is the ID of Non Clustered index [IX_students_name] which is obtained from sysindexes table.So we see only the pages of [IX_students_name] in our result set.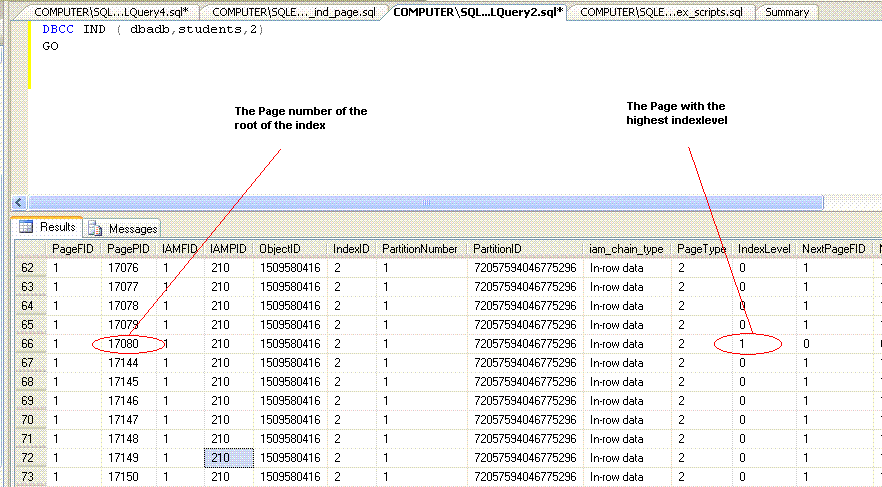
The command will show all the pages in the index. To identify the root of the index , identify the row with the highest Indexlevel. Indexlevel 0 refers to leaf pages. In Students table, the highest Indexlevel is noted as 1( which means there are only two levels on the index ie root and leaves ) and the page number is 17080.
2) Checking the contents of the root page
For checking contents of the root page execute the following command.
DBCC traceon(3604)
DBCC page(dbadb, 1, 17080, 3)
GO 
You would see the non clustered key and clustered index key ( sid ) column on the root page of [IX_students_name].But there wont be any Unique Identifier as the Clustered index is unique.
Non clustered index structure with a non unique clustered index:
Now let us check the structure of the Non clustered index when we have Non Unique clustered index.For that let us alter our clustered index to non unique cluster using the following command.I have just removed the UNIQUE keyword from the earlier script and recreated the clustered index using DROP_EXISTING = ON option.
CREATE CLUSTERED INDEX [CIX_students_id]
ON [dbo].[Students] ( [sid] ASC )
WITH ( drop_existing = ON) ON [PRIMARY]
After executing the above command, the clustered index is non unique.
Now let us again analyze the structure of Non clustered index.
1) Root of the index
DBCC ind ( dbadb, students, 2)
GO 
Root page number is noted as 15992
2) Contents of the root page
DBCC traceon(3604)
DBCC page(dbadb, 1, 15992, 3)
GO 
Picture of index page with Uniquifier
You would notice that a new column called 'Uniquifier' is added to the non clustered index's leaf page as the clustered index is not unique anymore. Uniquifier has NULL values as there are no duplicate rows in the table.
Let us introduce a duplicate value in the table using the following script.
SELECT *
FROM students
WHERE sid = 100000
GO
/* just to confirm that i have only one row. */
INSERT INTO students
SELECT *
FROM students
WHERE sid = 100000
/* Manually inserting a duplicate */
SELECT *
FROM students
WHERE sid = 100000
GO
/* Verifying that we have a duplicate */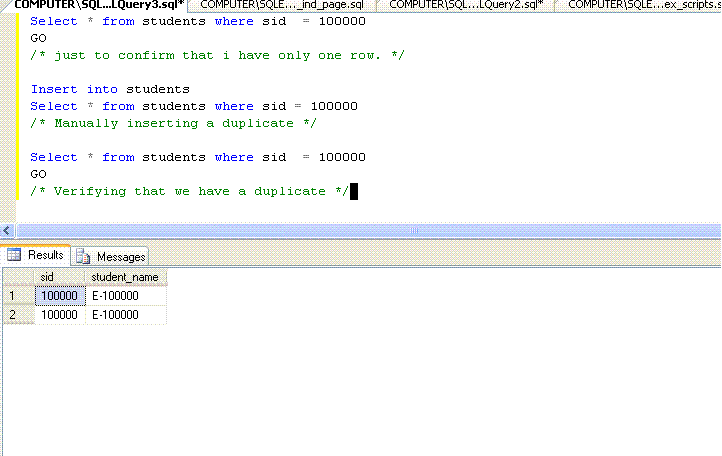
Note that the row has a value E-100000 on student_name column
Locating a value with in the index using DBCC IND/ DBCC PAGE:
To see how uniquifier is used in Non clustered index ,we need to find the duplicate row on the Non Clustered index with the value 'E-100000'. To do the same let us follow the following steps.
1) Finding the root page:
We already know that root page id of [IX_students_name] is 15992
2) Identify the page in which E-100000 is residing
Fire the same DBCC page command used earlier
DBCC traceon(3604)
DBCC page(dbadb, 1, 15992, 3)
GO
The resultset of DBCC PAGE is quite similar to a telephone directory index page where key column(s) ( student_name ) is the name of the person we are searching for and ChildPageid column is the Pagenumber in the directory.
For example,observe the Picture of index page with Uniqufier posted above.The value A-19032 on the student_name column ( 2nd row ) indicates that page number 15929 ( child page id ) contains rows starting from A-19032 and just before 'A-28080'. So to find E_10000 we should scroll to the row that exceeds (alphabetically) E-10000 by just and then goto the previous row and pick up the corresponding childpageid.
Observe the first row that alphabetically exceeds E-100000.
Refer to the row before that which is likely to contain E-100000.ChildPageID gives the page number of the page linked to row. The Childpageid on the immediate previous row exceeding E-100000 is 8605. So Page number 8605 should contain E-100000.So, execute the following command.
DBCC page(dbadb, 1, 8605, 3)
GO 
Notice two rows with 'E-100000' which reflect the duplicate row we inserted earlier.
Note the uniquiefier column for rows containing E-100000. They have values of 0,1 which will be used to identify the correct row in the clustered index.
So, the conclusion of this long post is if you have a Non unique clustered index,
then additional Uniquifier column will be added in the Non clustered index to locate the correct row.
Monday, August 9, 2010
DBCC IND/ PAGE - Non Clustered Index structure on a table with Unique/Non unique Clustered index

Monday, August 2, 2010
DBCC IND, DBCC PAGE - Intro
DBCC IND
DBCC IND command provides the list of pages used by the table or index. The command provides the page numbers used by the table along with previous page number,next page number. The command takes three parameters.
Syntax is provided below.
DBCC ind ( <database_name>, <table_name>, non clustered index_id*)
The third parameter can either be a Non Clustered index id ( provided by sys.indexes ) or 1,0,-1,-2. -1 provides complete information about all type of pages( in row data,row over flow data,IAM,all indexes ) associated with the table. The list of columns returned are provided below.
IndexID: Provides id of the index. 0 - for heap, 1 - clustered index.,Non
clustered ids > 2 .
PagePID : Page number
IAMFID : Fileid of the file containing the page ( refer sysfiles )
ObjectID : Objectid of the table used.
Iam_chain_type: Type of data stored ( in row data,row overflow etc )
PageType : 1 refers to Data page, 2 -> Index page,3 and 4 -> text pages
Indexlevel: 0 - refers to leaf. Highest value refers to root of an index.
NextPagePID,PrevPagePID : refers to next and previous page numbers.
Example:
The command provides the pages used by table named Bigtable in database dbadb.
DBCC ind(dbadb, bigtable, -1)

DBCC PAGE:
Next undocumented command we would be seeing is DBCC PAGE:
DBCC PAGE takes the page number as the input parameter and displays the content of the page.Its almost like opening database page with your hands and viewing the contents of the page.
Syntax:
DBCC page(<database_name>, <fileid>, <pagenumber>, <viewing_type>)
DBCC PAGE takes 4 parameters. They are database_name, fileid, pagenumber, viewing_type.Viewing_type parameter when passed a value 3 and displays the results in tabular format.If you are viewing a data page then the results are always in text format. For Index pages, when we pass the value 3 as parameter we get the results in a tabular format.DBCC PAGE command requires the trace flag 3604 to be turned on before its execution.
A sample call is when a Index page is viewed is provided below:
Note that the page number picked (9069) is a page from clustered index of the table
'Bigtable'. 'Bigtable' has a clustered index on a column named 'id' .
DBCC traceon(3604)
GO
DBCC page(dbadb, 1, 8176, 3)
GO

Useful columns returned are provided below:
Level : Index level
id(Key) : Actual column value on the index. The indexed column name suffixed with '(key)' becomes a part of a result set. If your index has 4 columns then 4 columns with the suffix '(key)' will be a part of your result set. In the above example the data/values on column 'id' present in the page 8176 are displayed.
ChildPageid: Pageid of the child page.
A sample call when a data page number is passed is shown below:
DBCC traceon(3604)
GO
DBCC page(dbadb, 1, 9069, 3)
GO
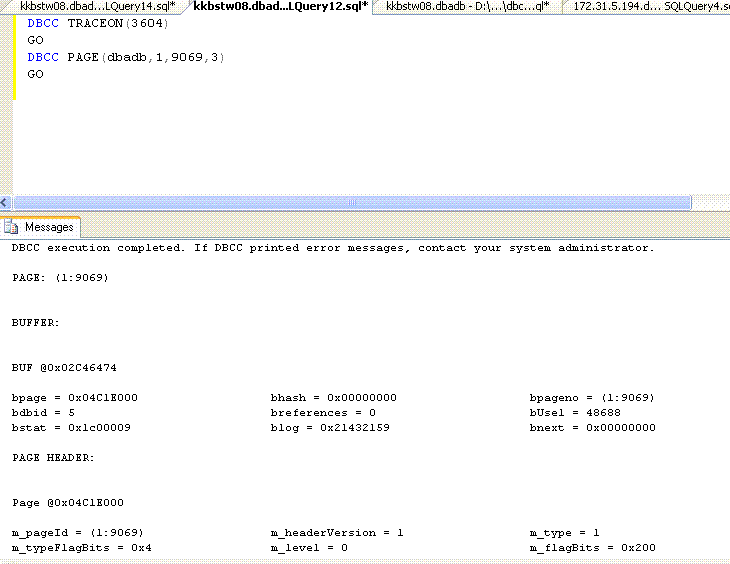
Bit cryptic to read the text format results. But anyways we will using it less compared to index page results.
What we intend to do with these two commands ?
These two commands help us understand index structures, they way pages have been allocated and linked in a much better way. DBCC IND and PAGE are the two commands with which we can really get our hands dirty while trying to understand index structures. In the next couple of posts, I will analyze index structures using these commands and provide some interesting inferences on how index structures are arranged internally.
References : As usual Kalen Deanley - SQL Server Internals :)
Sunday, July 25, 2010
Disabling Primary Key/ Clustered index
Most of us are aware that indexes and constraints can be disabled. This post will concentrate on what happens when a Clustered index or Primary key is disabled.
When a Clustered index is disabled , irrespective of whether it is a part of primary key or not, the entire table is placed offline. Placed offline essentially means that one cant issue any select/insert/update/delete on the table and also all the other indexes associated with the table are disabled. When a clustered primary key is disabled, in addition to the impact happening because of disabling clustered index, the foreign key constraints on the tables that are referencing the disabled primary key are disabled as well.But the most important part is when you enable back your primary key, the foreign key constraints still remain disabled. We will see a quick example.
I have a student table with sid column as clustered primary key.
CREATE TABLE [dbo].[Student]
(
[sid] [INT] NOT NULL,
[student_name] [VARCHAR](50) NULL,
CONSTRAINT [PK_Student] PRIMARY KEY CLUSTERED ( [sid] ASC )
)
GO
CREATE INDEX ix_student_name
ON [Student]([student_name])
GO
Student_marks table references student table. Script for the same is provided below.
CREATE TABLE [dbo].[student_marks]
(
[sid] [INT] NOT NULL,
[marks] [INT] NULL,
[subject_name] [VARCHAR](50) COLLATE sql_latin1_general_cp1_ci_as NOT NULL,
[subject_id] [INT] NOT NULL,
)
GO
ALTER TABLE [dbo].[student_marks] ADD CONSTRAINT [FK_student_marks_Student]
FOREIGN KEY([sid]) REFERENCES [dbo].[Student] ([sid])
GO
Let us disable the primary key on the student table. It can be done by
ALTER INDEX pk_student ON dbo.student DISABLE
GO
Warning: Foreign key 'FK_student_marks_Student' on table 'student_marks' referencing table 'Student' was disabled as a result of disabling the index 'PK_Student'.
Warning: Index 'IX_student_name' on table 'Student' was disabled as a result of disabling the clustered index on the table.
We obtain a warning message saying that the Non Clustered Index on student table and the foreign key constraint on student_marks table are disabled.The same can be confirmed by querying sys.foreign_keys tabled. The is_disabled column with a value one indicates that the constraint is disabled.
SELECT Object_name(parent_object_id) AS table_name,
Object_name(referenced_object_id) AS referenced_pky_tbl_name,
is_disabled,
name AS constraint_name,
type_desc
FROM sys.foreign_keys
WHERE Object_name(referenced_object_id) LIKE 'student' 
Now let me enable the Primary key constraint back on student table.
The command used is provided below.
ALTER INDEX ALL ON dbo.student rebuild
Primary key constraint is enabled by using the Index Rebuild command. One can rebuild just the Clustered index to enable the primary key but that would not enable the other non clustered indexes on the table. ALTER INDEX ALL enables all the indexes that are present in the table and hence it is the recommended command if you have disabled your clustered primary key.
To prove that foreign key is not enabled,let me insert a row into student_marks table which violates the constraint.I execute the following script which effectively proves the same.
SELECT *
FROM student
WHERE sid = -1
GO /*-- To ensure that no row on student has sid = -1 */
INSERT INTO student_marks
(sid,
subject_id,
subject_name,
marks)
SELECT -1,
1,
'Tamil',
60
GO
SELECT *
FROM student_marks
WHERE sid = -1
GO /* to confirm that insert was successful */
SELECT Object_name(parent_object_id) AS table_name,
Object_name(referenced_object_id) AS referenced_pky_tbl_name,
is_disabled,
name AS constraint_name,
type_desc
FROM sys.foreign_keys
WHERE Object_name(referenced_object_id) LIKE 'student'
GO 
To enable the constraint first delete the invalid row and then use Check constraint command.
DELETE student_marks
WHERE sid = -1
GO
ALTER TABLE [dbo].[student_marks] WITH CHECK CHECK CONSTRAINT CONSTRAINT [FK_student_marks_Student]
So, the conclusion of this post is always remember to enable the foreign key constraints after you have disabled and enabled your primary key. Let me finish the post with a quick script to generate a script for enabling foreign key
constraints.
DECLARE @primary_key_tbl_name VARCHAR(500)
SET @primary_key_tbl_name = 'student'
SELECT 'ALTER TABLE [' + sys.schemas.name + '].[' +
Object_name(parent_object_id) +
'] WITH CHECK CHECK CONSTRAINT [' + sys.foreign_keys.name + ']' AS
enable_fky
FROM sys.foreign_keys,
sys.schemas
WHERE Object_name(referenced_object_id) LIKE @primary_key_tbl_name
AND is_disabled = 1
AND TYPE = 'F'
AND sys.schemas.schema_id = sys.foreign_keys.schema_id
GO
Set the value of @primary_key_tbl_name to the table whose primary key you have disabled. Executed the script after you have disabled and enabled the primary key. The Script pulls the related foriegn keys to the table and generates the enable script for the same.
Monday, July 19, 2010
Number of Drives,Location and Raid levels
When you are setting up your new server, One of the important tasks you have its to pick the right number of disks for correct purposes at the correct RAID level. This article briefly deals with the same.
SQL Server Data files: One needs atleast one dedicated drive for Data files. Ideally, for best performance one needs the disk to be have it Raid 10 as it involves random reads and random writes.
SQL Server Log files: Log files have more sequential reads and writes. To avoid any IO contention, one needs a dedicated drive at Raid 1.
SQL Server Backups: Backups are always to be kept on a drive different from data and log files so that they don't become a single point of failure. ie., When your data/ log file drive gets corrupted then your backups are also lost , if placed on the same drive. As Backups involve high writes RAID 1 / RAID 10 is recommended.
Location of Operating System: Operating system is ideally to be placed in C:\ drive and should always be kept away from data file drive, log file drive and backup drive.
Location of SQL Server executables: SQL Server's executables are similar
to operating system files and hence we are better off keeping them away from Data and log files.
Tempdb location: In general, tempdb involves heavy writes and ideally Raid 1 or Raid 10 is recommended.It is a luxury if you can afford a separate disk for tempdb. If your application heavily uses tempdb then you are strongly recommended to do so.
So, Ideally one atleast needs 3 dedicated disks for SQL Server with one each for Data file , Log files, Backups.Note that this doesn't include C drive required for Operating system + SQL Server's executable.Out of the 3 dedicated SQL Server, one is expected to be on RAID 10. I realize that RAID 10 is the most expensive but all good things in this world are expensive., aren't they :) The most popular raid level, RAID 5 is mostly good for reads and for file servers which don't change much. RAID 5 performs 50% slower than RAID 10.
References: As usual another cool Brad McGhee article from here.
Wednesday, July 14, 2010
Does IDENTITY_INSERT reset identity?
Most of us are aware that if we want to force a value of our choice on a identity column then we use the command SET IDENTITY_INSERT table name ON . But does that reset the identity? What kind of impact does it have on the current identity is what we will see on this post.
Consider the following script.
CREATE TABLE test_table
(
auto_id INT IDENTITY(1, 1),
somedata VARCHAR(50)
)
GO
/* Creating a table with a identity value */
INSERT INTO test_table
SELECT 'x'
GO 10
Note that GO followed by number executes the same query number of times. The above statement on a query analyzer/ssms inserts 10 times producing 10 rows on the test_table.
To confirm the current identity value let us use ident_current command
SELECT Ident_current('test_table') 
As expected the current identity value is 10.
Let us push the value 50 into the table. It can be done by
SET identity_insert test_table ON
INSERT INTO test_table
(auto_id,
somedata)
SELECT 50,
'x'
SET identity_insert test_table OFF
Now let us check the identity value again.
SELECT Ident_current('test_table') 
The identity value has been reset to 50. To confirm the same, let us do a insert of a row and verify the value.
INSERT INTO test_table
SELECT 'x'
SELECT MAX(auto_id),
Ident_current('test_table')
FROM test_table 
The new value inserted is 51 as shown in the picture.
So this effectively proves that SET IDENTITY_INSERT resets the value of the identity column.But wait.There is some more. Let us try to force another value, but this time lower than the current identity value 51.So let us force 25.
SET identity_insert test_table ON
INSERT INTO test_table
(auto_id,
somedata)
SELECT 25,
'x'
SET identity_insert test_table OFF
Let us check the current seed.
SELECT MAX(auto_id),
Ident_current('test_table')
FROM test_table 
The seed still remains at 51 as it was earlier. So, IDENTITY_INSERT hasnt reset the identity this time.
So, the conclusion is IDENTITY_INSERT resets the value if the value forced is higher than the current identity value.If the value forced is less than the current identity value then IDENTITY_INSERT doesnt reset the value. This behaviour helps when one needs to fill any gaps caused in the identity column because of delete statments.
What are the other commands that can affect identity property?
1) Truncate table resets the identity value seed set at the table creation. However, if the table contains any foriegn key contraints then truncate table doesnt work.
2) DBCC CHECKIDENT(table_name,reseed,new_seed_value):
Checkident can reseed the table's seed to new value whereas truncate always sets the identity value to the value set initially at the table creation.
All the options specified above namely identity_insert,truncate_table,DBCC checkident require sysadmin, db_owner or DDLadmin rights on the sql server/database.
Thursday, July 8, 2010
Lock Monitoring - SQL Server 2005
As mentioned in the previous post, the query provided below can be
use to check locking on sql server 2005. Script is Simple , but powerful :)
SELECT spid,
TEXT AS [query],
request_mode,
request_type AS LOCK,
request_status,
sys.dm_tran_locks.resource_type AS object_type,
Db_name(sysprocesses.dbid) AS dbname,
cpu,
memusage,
physical_io,
status AS query_status,
loginame,
hostname,
lastwaittype,
last_batch,
cmd,
program_name,
open_tran,
Db_name(sys.dm_tran_locks.resource_database_id) AS locked_database_name
FROM sys.dm_tran_locks,
sys.sysprocesses
OUTER APPLY Fn_get_sql(sql_handle)
WHERE spid > 50
AND sys.dm_tran_locks.request_session_id = spid
ORDER BY request_mode DESC 
Wednesday, July 7, 2010
Lock monitoring - SQL Server 2000
One of the important parts of performance monitoring is monitoring locks. Imagine a situation, where you have a query that just waits for long and
you want to find which query and connection is locking it. One option is to use sp_lock and check which connection holds exclusive lock and then check
use dbcc inputbuffer to find the actual query. Another option is to Activity monitor on the Enterprise manager. Both of these dont directly specify the query responsible for locking. The following script will list the queries along with the locks held by them.
CREATE TABLE #sp_lock_details
(
spid INT,
dbid INT,
objid INT,
indid INT,
TYPE VARCHAR(100),
resource VARCHAR(1000),
mode VARCHAR(10),
status VARCHAR(50)
)
INSERT INTO #sp_lock_details
EXEC Sp_lock
DECLARE @id INT
DECLARE @max INT
DECLARE @spid INT
DECLARE @exec_qry VARCHAR(100)
DECLARE @monitored_dt DATETIME
SET @monitored_dt = Getdate()
CREATE TABLE [#sysproc]
(
id INT IDENTITY(1, 1),
[spid] [SMALLINT] NOT NULL,
[dbname] [NVARCHAR](128) COLLATE sql_latin1_general_cp1_cs_as NULL,
[cpu] [INT] NOT NULL,
[memusage] [INT] NOT NULL,
[status] [NCHAR](30) COLLATE sql_latin1_general_cp1_cs_as NOT NULL,
[loginame] [NCHAR](128) COLLATE sql_latin1_general_cp1_cs_as NOT NULL,
[hostname] [NCHAR](128) COLLATE sql_latin1_general_cp1_cs_as NOT NULL,
[lastwaittype] [NCHAR](32) COLLATE sql_latin1_general_cp1_cs_as NOT NULL,
[last_batch] [DATETIME] NOT NULL,
[cmd] [NCHAR](16) COLLATE sql_latin1_general_cp1_cs_as NOT NULL,
[program_name] [NCHAR](128) COLLATE sql_latin1_general_cp1_cs_as NOT NULL,
QUERY VARCHAR(255),
open_tran INT
)
ON [PRIMARY]
CREATE TABLE #dbccinfo
(
eventype VARCHAR(255),
param INT,
eventinfo VARCHAR(255)
)
INSERT INTO #sysproc
(spid,
dbname,
cpu,
memusage,
status,
loginame,
hostname,
lastwaittype,
last_batch,
cmd,
program_name,
open_tran)
SELECT spid,
Db_name(MASTER.dbo.sysprocesses.dbid) AS dbname,
cpu,
memusage,
status,
loginame,
hostname,
lastwaittype,
last_batch,
cmd,
program_name,
open_tran
FROM MASTER.dbo.sysprocesses
WHERE spid > 50
SET @max = @@IDENTITY
SET @id = 1
WHILE ( @id <= @max )
BEGIN
SELECT @spid = spid
FROM #sysproc
WHERE id = @id
SET @exec_qry = 'DBCC INPUTBUFFER(' + CONVERT(VARCHAR(3), @spid) + ')'
INSERT INTO #dbccinfo
EXEC (@exec_qry)
UPDATE sys
SET QUERY = eventinfo
FROM #sysproc sys,
#dbccinfo
WHERE @id = id
TRUNCATE TABLE #dbccinfo
SET @id = @id + 1
END
SELECT #sysproc.spid,
QUERY,
#sp_lock_details.mode AS LOCK,
TYPE AS object_type,
dbname,
cpu,
memusage,
#sysproc.status AS query_status,
loginame,
hostname,
lastwaittype,
last_batch,
cmd,
program_name,
open_tran,
Db_name(#sp_lock_details.dbid) AS locked_object_dbname,
#sp_lock_details.indid AS locked_obj_indid
FROM #sysproc,
#sp_lock_details
WHERE #sp_lock_details.spid = #sysproc.spid
ORDER BY #sp_lock_details.mode DESC
DROP TABLE #dbccinfo
DROP TABLE #sysproc
DROP TABLE #sp_lock_details 
Fairly simple script. Logic is to get the sp_lock details along with sysprocesses details and fire a inputbuffer or each spid.The Script provides the query involved along with the details from sysprocesses and hence it covers all the info provided by Activity monitor and adds a valuable addition by giving the query as well.The script provides the results in descending order of lock mode, so
that 'X' the exclusive lock, which most of us are interested in comes first.
The Script for SQL Server 2005 is even more simpler, which I will post in the next post.